Today I decided to make party invitations for my little girl who is turning 1 at the beginning of March. I originally wasn't going to make invitations because it's only family, but I was inspired by a new friend, Samantha :)
Here is the result:
Birthday invitation materials needed:
White 12x12 paper
6 sheets of 12x12 coordinating papers
1.5"x1.5" yellow tissue paper
Googly eyes
white pipe cleaner
paper trimmer
pop dots
foam tape
dry adhesive (I used Xyron)
liquid adhesive
scoring board
hotfix rhinestones and setter
hot glue gun
straight pin
Cricut Cartridges used:
Gypsy Wanderings
Once Upon a Princess
Wild Card
Imagine: Blast Off
Process:
Cut a piece of white paper to 5x12"
Score at 2" and 7.25"

 |
| The Paper will not meet exactly at the fold line |
Cut 2 patterned papers into 2 squares of each pattern 5"x5"
Cut a patterned paper to 5"x2"

Run the 5"x5" squares and 2"x5" rectangle through Xyron

Cut a piece of white paper to 2"x5"
On the 5" side of folded white paper, place a 5x5 square lined up with the fold

Line the other 5x5 sheet of the same patterned paper up with the fold on the side opposite where you just adhered the first one.
 |
| Now both sides of the long folded side of the white paper should be covered |
Place the other patterned 5x5 sheet on upper side of folded white paper 2" above the fold
 |
| The adhesived side will be sticky below the folded white paper, that's OK, it'll be covered up |

Place the 2"x5" of white paper on the 2" that are sticky above the fold.
Place 2"x5" patterned paper so that it hangs down 1" below the patterned paper that you just placed on the front of the card
On the inside of the card place the other sheet of patterned paper to cover up the seam between the two different papers you've placed to show on the front.
These papers will NOT meet up, that's OK, just trim so that the piece of paper that hangs down 1" is even with the back piece of paper.
 |
| 2"x5" paper covering up adhesive on back |

 |
| This is what the front should look like after you trim up the paper hanging below the 1" line on the backside. |
 |
| The reverse of the top flap |
 |
| What the card looks like folded at this point. |
 |
| Back of the card when folded. |
Now for the fun part! The cutting!!
From the Wild Card cartridge cut:
the invitation phrase that says: Event, Place, Date, Time, RSVP (I didn't use RSVP) @ 5" relative size
The phrase that says: You're Invited @ .75" actual height
From the Gypsy Wanderings cartridge cut:
Celebrate and it's Shadow @ 1" height
From the Once Upon a Princess cartridge cut:
the cupcake with a smile @ 1.5" height (I used my gypsy to hide the cupcake icing)
(Event, Place, Date, Time, RSVP, You're Invited, and the Shadow of "Celebrate" are all the same color)
Run all of these pieces through the Xyron

Attach a contrasting color paper to the back of the cupcake wrapper so that the eyes and mouth stand out (rather than cut one specifically for that purpose on the Cricut, I just backed mine with a square.)
 |
| backed cupcake |

Place a piece of foam tape to the back of the cupcake wrapper.
Attach "You're Invited" and the cupcake to the front of the card.
Attach Event, Place, Date, Time, and RSVP to the inside of the card.

To make the icing for the cupcake, twist the white pipe cleaner back on itself about an inch, then make a 2" base and zig-zag the cleaner back and forth on itself, getting smaller each time.
 |
| Pipe cleaner bent back on itself |
 |
| Finished icing |
To make candle:
Cut a 1"x1" square of paper in the patterned paper used for the 1" strip on the front of the card
Roll the paper around a narrow pen
Adhere using liquid glue
 |
| Candle |
Attach icing and candle to front of the card using a hot glue gun (be careful!)
From Imagine: Blast Off cartridge
Cut the number 1 twice @ 1" actual size
Cut the castle @ 1.5" actual size
(Change colors to match your chosen patterned paper)
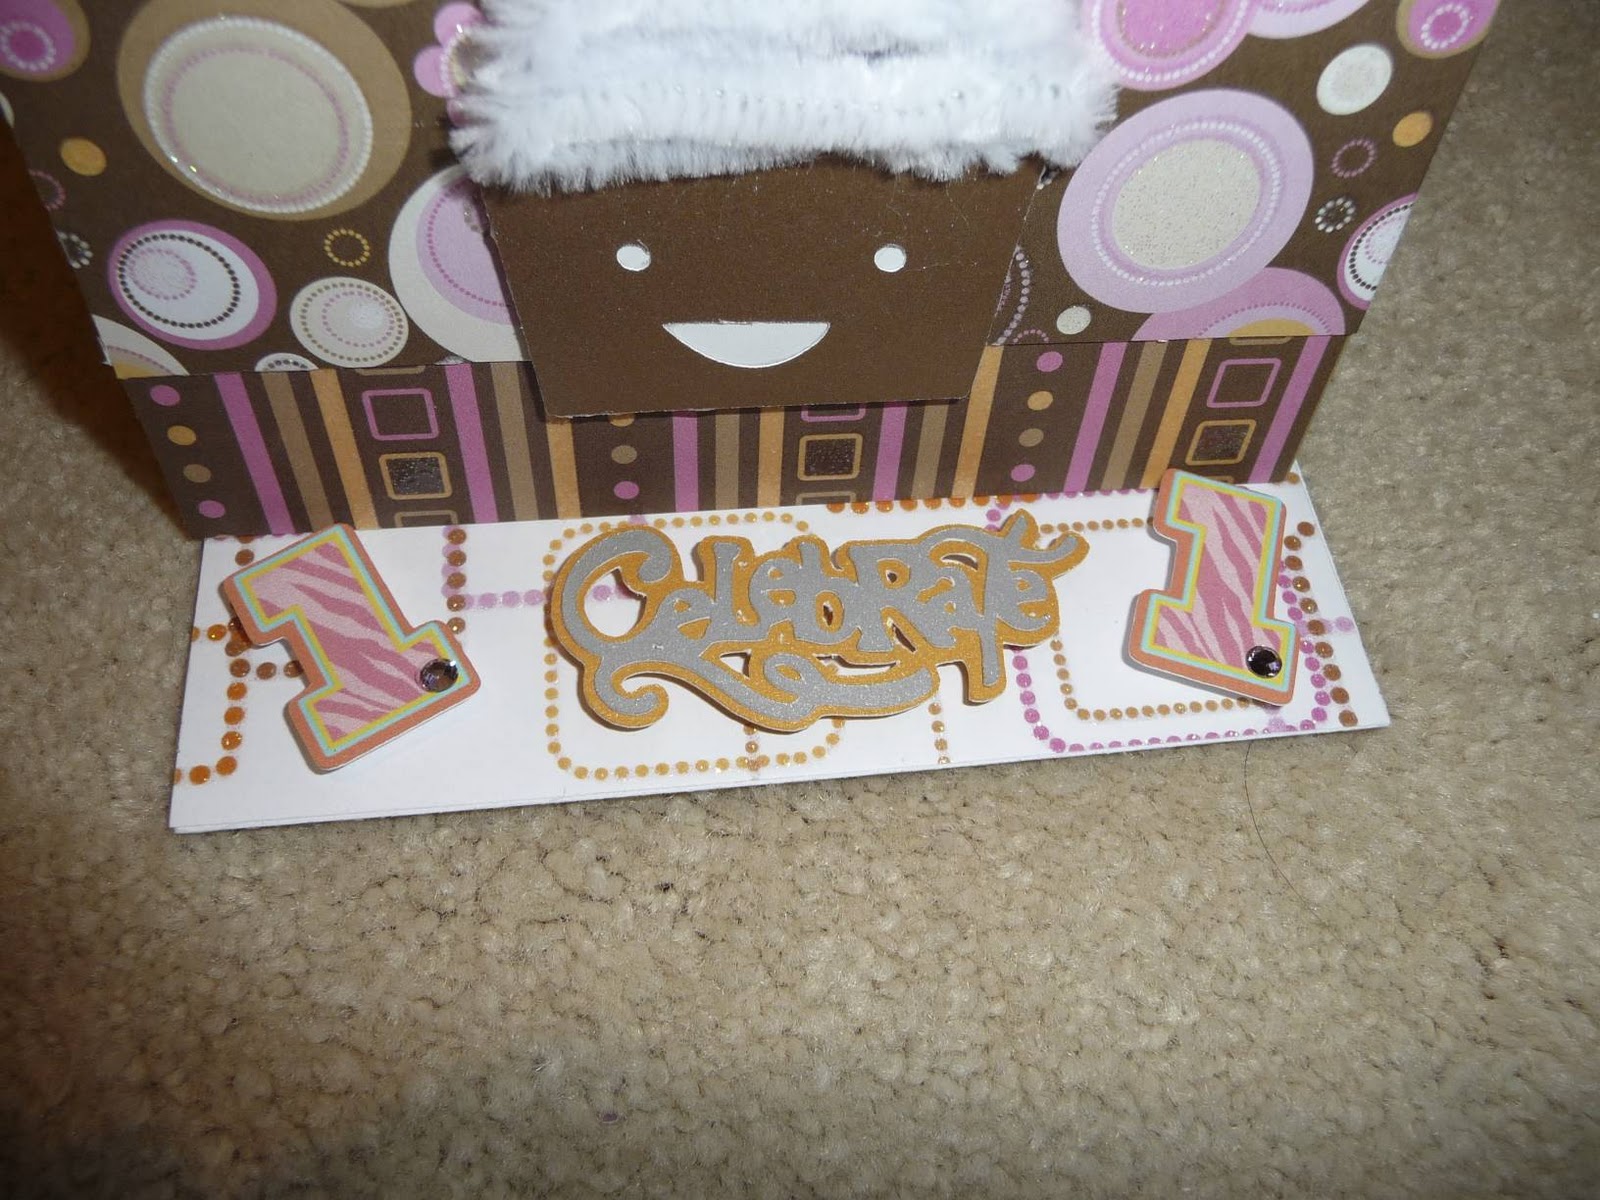
Attach hotfix rhinestones to the lower right corner of the 1's
Attach castle to the lower right corner of the inside of the invitation.
 |
| Rhinestoned 1's |
 |
| Inside of Invitation |
Add Pop Dots to 1's and place on the inside bottom of the card.

Add Pop Dots to "Celebrate" and place between the 1's on the inside bottom of the card.
Wrap Tissue paper around the head of the pin.
Add liquid glue.

Stuff the glued tissue inside the candle tube.
 |
| Lit candle. |
Use liquid glue to attach googly eyes to cupcake
 |
| Finished product inside |
 |
| Finished product outside. |
 |
| My daughter's invitations |
 |
| Inside of my daughter's invitations |
No comments:
Post a Comment